|
|
How We Create Diamond Rings
Gem Rings by Chard
Chard have been selling gold by mail order since 1964.
In about 1980 we started making diamond rings, starting with simple solitaire, two stone and three stone diamond rings.
Since then, we have made diamond and gemstone rings in over 600 different styles
Only in late 1998 did we start to show our ring catalogue in the internet, along with other gold jewellery, gold coins, and collectors coins, on our original website 24carat.co.uk.
For now, it may be best to visit our old site, but in the first few months of 2000, we will be developing this site gemrings.co.uk as our gem ring catalogue.
This website is brand new, and we are designing it live as we go along. If you find any rough edges to it, we apologise in advance, but please come back for another look in a few weeks.
Meanwhile, here is a brief insight into our design and production process:-
Our Diamond Ring Creation Process
How We Design and Manufacture our Diamond Rings -Your Diamond Ring!
We are always being asked "Do you make them yourselves", and many similar questions. Very briefly, I will run through our usual process. Other people will work in different ways, depending on whether they are a small craft jeweller making individual pieces at designer prices, or a large mass-production manufacturer aiming for high volume markets. We are between these two extremes. We try to create designs that will be popular and sell repeatedly over a period of time, but each single ring is produced with the loving care it would receive if it were a one-off designer creation.
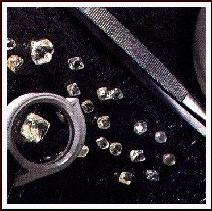
1) We start with an idea or inspiration.
This can come from my imagination, from a customer comment, form an antique piece of jewellery. Wherever the idea originates, I avoid copying it, but often allow it to take my thoughts along with it, trying out variations and improvements until something takes shape. At this stage, I will usually know what stones we intend to use. "All-diamond" rings sell best, but I also like to work with coloured gemstones, as I feel that they are more interesting. Diamonds are alright, but they get a bit boring, and there is so much more to a really attractive coloured stone, colour to start with!
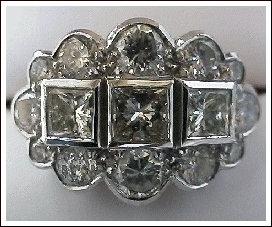
2) The basic layout.
If the ring is a cluster, it used to take hours to draw out different variations on the same theme with different stone sizes. For the past few years I have been using Corel Draw, a computer drawing program to help with the basic stone layouts. When I make diamond rings, I like them to be diamond rings, without lots of gaps and metal in between, and the feedback from most of our customers tells me to use larger diamonds.
3) Cost Estimate
When I have what I believe to be a great idea, I try not to be held back by the question of cost. I certainly don’t believe in designing a thing down to a target cost price. However, I do try to keep an awareness of the eventual price, and sometimes scale down a particular design to create a price range of products.
4) Details
Having got the basic layout on computer, it’s easy to print out copies of major variations, and get some consumer feedback, largely from our staff, but also from any customers who happen to be around. At this point, the details about the shank, weight, finger size and other points get decided.
5) Making the Master Model
The computer drawing goes to a model maker, who usually makes a few changes, sometimes improvements, often just failure to follow the dimensions. As I usually do the print-outs at a scale of 10:1, the dimensions should be idiot proof, just measure from the drawing in centimetres, and make the model in millimetres. It could hardly be simpler. I also enclose a full size print, often showing alternative (coloured) centre stones. Master model makers are usually in good demand and charge premium prices. Also whenever I need something I have to wait, because their bigger and more important customers are in a hurry to get their new collections out in time for the trade fairs. The model is usually made in silver because it is inexpensive and very forgiving to work with, can be soldered, and cut, drilled, even scrapped and re-started. Other models might start out life as a wax carving, be cast in silver, then re-worked into the final shape.
6) Check the model against the drawings
 Very occasionally it may be right first time, but it’s quite normal for some adjustments to be made, and the model makers will complain that the drawing isn’t much good, and I’ll point out that they haven’t measured properly. When they think they can see a possible improvement, I just wish they would talk to me about it first!
7) Making the master mould
Once I am satisfied with the master model, it goes to a mould maker, usually at our casters. His first job is usually to remove and reposition the inadequate casting sprue that the model maker has provided. The sprue is the feed "stick" by which the wax is attached to the "tree", and through which the metal flows during casting. The mould is made of rubber latex, and is made by laying the model on strips on rubber, the packing it with more rubber strips in a special type of box which can be tightened up by screws. The mould is then vulcanised or cured by heating, after which the model has to be carefully cut from the mould. This is a highly skilled operation; the rubber cutter needs to know how and where to cut the mould usually into two halves, so that it can be quickly and easily re-assembled, and most importantly so that when the wax has been injected into the mould, the cooled, solidified wax can be successfully retrieved from the mould without damage or distortion.
8) Buying the gold
We always use our own gold for casting, but instead of supplying physical metal for each different alloy we need for each casting batch, we provide to our caster a supply of fine gold, usually 99.99% pure. Our Caster credits this to our metal account, and then debits this account each time he casts for us. We pay him an alloying charge, and he also charges us a percentage "loss" (our loss and his gain!). We also pay him for any silver or palladium content needed for any of the alloys. For this, he takes care of any sprues andother scrap. Most of our casting is done by one company who we have found provide consistently high quality castings. They are probably one of the best quality caster in Europe. There are a few drawbacks such as minimum quantity charges, and they are definitely more expensive than many.
9) Cast.
This over-simplifies this stage of the process, although all we needto do is place the casting order, and our caster does the rest. What he does, and we don’t need to see, follows.
9a)
A waxer takes our mould and, using a wax-injector, fills the mould with a specially formulated casting wax, at about 70°
Celsius. From experience, I know that’s quite hot if you don’t keep a good grip on the mould, and the hot wax squirts out of the sides of the mould and sticks to the fingers and hands, especially when it gets to the delicate skin in the webs between the fingers. Each wax is checked to ensure it is complete, then stored ready for the next process.
9b)
The waxes need to be sorted according to the alloy to be cast, and also so that pieces of dissimilar weight are not cast in the same batch. All the waxes for a casting batch are then assembled onto what looks like a wax candle, attaching them by dipping the end of their sprue into molten wax, then sticking onto the candle to form what looks like a Christmas tree, and is universally and descriptively called a tree for this reason.
9c)
Once the tree is completed, it is placed into a round "can", and an "investment" mixture is poured into the can. This mixture is usually based on gypsum (plaster of Paris), sometimes ceramics, depending on alloys and temperatures. The investment is vibrated to remove any air bubbles,allowed to set. Once set, it is inverted and placed into a kiln or oven, and the temperature slowly increased so that most of the wax melts, leaving a void which will eventually become a jewellery component. Once melting has been completed, the kiln temperature is increased again carefully, so that any residual wax is burnt out. One of the requirements of a good casting wax is that it will burn cleanly without leaving any residue or ash. The "can" is now ready for casting.
9d
The can needs to be brought carefully up to the correct temperature for casting, and will start to deteriorate if casting is delayed for too long, or if held at too high a temperature. Meanwhile the gold alloy is melted, preferably in an electric induction furnace, but otherwise in a reducing atmosphere. Once the metal and the can are at the correct temperature, then the cast occurs. There are two main methods, one is centrifugal casting, where the crucible containing the melt and the can are held on a rotor arm which is spun, again at a carefully controlled speed, and a mechanism tips the crucible when the centrifuge is at speed. The second method, used mainly by larger commercial casters, including ours, is a static vacuum assisted method. As the melted alloy is poured, the base of the flask containing the "can" has its air pumped out to create a vacuum. Both these processes help to squeeze the alloy into all the parts of the investment mould so that complete filling of the mould takes place.
9e)
Depending on the type of alloy being cast, the flask may be plunged into cold water or acid, to help break up the investment plaster, or it may be allowed to cool first. The investment is broken away by acid or by water jets, leaving a gold tree comprised of tens or hundreds of jewellery components, still attached like fruit on its tree. The components are snipped off the tree leaving only a small sprue. They should then be checked by the casters, and then sorted into their correct packets matching the orders. I’ve never had to do this, but it must be a nightmlare of a job judging by the time it takes us to sort out our own components when they have been for assay.
9f)
The caster weighs each batch of castings, and deducts the metal used from our account, and posts them out to us.
 10) Check Components.
That was a long interlude! When we receive them, we also check each component, weight each batch, and get them ready for testing at the assay office.
11) Hallmarking.
All products sold in the United Kingdom and described as gold silver or platinum, must be hallmarked after being tested for precious metal content at one of the four government appointed Assay Offices. The office at which we are registered is Sheffield, which for a long time served the British silverware and cutlery industry. We are allowed to supply the jewellery items in component form, but we must supply all the parts together with solder, wire, etc. The British hallmarking standards are very strict, and allow for zero tolerance in precious metal percentages. 18 carat gold for example must contain a minimum of 75% gold by weight, equal to 750 parts per thousand. If the sample tests as only 749 parts per 1000 the piece will be failed. Some lightweight articles, or very delicate pieces can be exempted from hallmarking. Provided that articles pass the test, they are stamped with a set of marks showing the assay office, the year, the alloy composition, and the sponsor (manufacturer). Contrary to some beliefs and claims, the assay or hallmark does not actually guarantee quality, it only guarantees that the alloy contains the correct proportion of precious metal.
12) Assembly
Once we get them back from the assay office, we re-sort the components into packets to send to our mounter, together with any special instructions, especially for new designs. The mounter’s job is to clean up the components, and then assemble them by soldering (technically brazing because of the high temperatures used). This all requires great care, and most of the important work is done by hand. We prefer to use the highest temperature (hard) solders, which doesn’t please our mounters because they would prefer to use medium, as it gives them more leeway for errors and is easier to use. After assembly, we polish the rings to a high standard as though they were a finished product. This helps to reduce the amount of final finishing after setting.
13) Check Assembled Mounts.
At this stage we finally have what looks almost like a complete ring. We do supply some of our ring mounts to other manufacturing jewellers, although we are moving towards keeping some of our "exclusive" patterns for our own exclusive use. If the mount is not right at this stage, we will often need to scrap it if it can not be corrected with a minor adjustment.
14) Buy Gemstones.
We do carry a stock of gemstones, but if we don’t have them all in stock, we buy stones to go into the mounts. In some cases we bought an important stone or a parcel of stones before we even designed the mount.
15) Pick Gemstones
By "pick" we mean select the set of stones which will be set into the piece to make up the ring. We carefully match the colour, the clarity, the brilliance, and the cut and shape of all the stones for each individual ring. Often, we actually "mock up" the finished ring by placing its set of stones on the mount to check that it looks right. This is a final quality matching check for the stones, and it is surprising how, even when all the separate stones have been thoroughly graded, there is one which needs to be changed at this stage because it "faces up" badly, perhaps because of a minor variation in its cut. All the stones are carefully weighed, and the weights are recorded into our computer database system rather than the old manual ledger system we used to employ.
16) Set the Gemstones
The ring mount with its stones, and any special instructions are sent to our diamond setter. His job as its title implies is to fix all the gemstones into the mount neatly and securely. There are many different styles and techniques used, but all need care and attention in a labour intensive part of the operation. Gemstones, including diamonds get broken during setting, even using the most careful and experienced setter. Metal claws, grains, beads, or rims need to be bent and pushed into place over the stones. Not too much claw, not too little, and all should appear very regular. If we have selected stones which are fractionally oversized, then the setter may need to cut out too much metal, which would weaken the setting. The metal must be pressed onto the stones firmly enough hold them tightly and securely, but if the setter presses too hard then, ping, a valuable stone can chip or completely shatter. Setting is probably the most dangerous time for any gemstone, if it survives, it can probably remain unharmed for a lifetime.
17) Finishing and Polishing.
Any burrs and sharp edges left by the setter need to be removed, and the whole piece gets a final polish. It is usual at this stage to rhodium plate any white components. Some manufacturers rhodium plate over yellow gold parts to make the ring appear to have been made of yellow and white gold alloys., but this invariably looks awful in a few years when the plating wears off. We prefer to leave any yellow parts yellow.
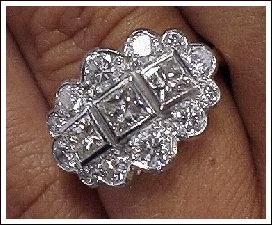
18) Final Inspection
Hopefully, everything is perfect, but we need to check that the setting work looks how we want it to, and to ensure that the final polishing has not loosened any of the claw setting work.
19) Costing
At last we can work out exactly how much the piece has cost us, and add our 10%!
20) Appraisal and Consumer Testing
The only person who really matters has still not seen the ring. Whether we have made the piece for a special order, or more usually just for our stock, the real test comes when we proudly show off our new babies, and hope the world likes them. The ultimate accolade is when the ring sells. Now that gives me real pleasure and a great kick. When our staff tell me about a big sale, I always ask what. When they tell me it was a second-hand piece (we don’t generally buy any new rings from other manufacturers), I am happy enough, but a little disappointed. When the sale was for one of my creations, well that’s about ten times better, that’s a pat on the head from the boss. Maybe I own the company, but our customers are my boss. I’m only trying to make what they will like.
|
521 Lytham Road, Blackpool, Lancashire, FY4 1RJ, England. Telephone (44) - (0) 1253 - 343081; Fax 408058; E-mail: enquiries@24carat.co.uk The URL for our main page is: www.gemrings.co.uk/index.html |